When it comes to motorcycle ownership, maintaining your ride is not just about performance; aesthetics also play a pivotal role. Among the various elements that enhance the look of a dirt bike, graphics are a popular choice. However, the time will inevitably come when those vibrant decals need to be removed. The process of how to remove dirt bike graphics can often seem daunting for motorcycle owners, yet understanding the challenges associated with it is crucial for both the bike’s appearance and its longevity. Improper removal can lead to residue, which may attract dirt and grime, affecting both the bike’s performance and its resale value.
Moreover, neglecting the proper techniques for removing dirt bike graphics can lead to unintentional damage to the underlying paint or plastics, making motorcycle repair an even more costly affair. Regular dirt bike maintenance involves much more than just maintaining the engine and tires; it encompasses ensuring that the exterior looks just as great as the performance it delivers.
As you navigate the world of dirt bike ownership and upkeep, remember that a clean, well-maintained bike not only showcases your passion for riding but also ensures your investment is preserved. Whether you’re considering an upgrade or just in need of a refresh, knowing the right ways to tackle the removal of your graphics is essential. Therefore, in this article, we’ll delve into effective methods to remove dirt bike graphics safely, ensuring your ride remains in pristine condition, ready for the next adventure. For further resources, feel free to explore our extensive range of dirt bike graphics and take the first steps toward a refreshed look for your bike.
Stay tuned as we uncover techniques, tips, and products tailored specifically for motorcycle owners who want to maintain their bikes, ensuring they remain not just functional but also visually appealing. After all, your dirt bike deserves the best – and so do you!
Common Reasons for Removing Dirt Bike Graphics
Motorcycle owners and technicians often find themselves wanting to remove dirt bike graphics for various reasons. Here are some of the most common motivations:
- Wear and Tear: Over time, graphics can fade, peel, or become scratched due to exposure to the elements and rough riding conditions. This deterioration can make the bike look worn out and less appealing.
- Customization: Many riders want to personalize their bikes to reflect their unique style. Removing the old graphics allows for the application of new designs that better represent their taste or brand.
- Resale Value: When selling a dirt bike, a clean and well-maintained appearance can significantly affect its resale value. Removing old graphics can help present the bike in its best light, appealing to potential buyers.
- Seasonal Changes: Some riders prefer to change their graphics based on seasons or specific racing events. For instance, they might want to remove summer-themed graphics in favor of winter designs.
- Damage Repair: If the graphics have been damaged – whether from an accident or natural wear – removing them provides an opportunity to fix the underlying issues and apply fresh graphics.
- Simplicity and Aesthetics: Sometimes, a clean slate without graphics is desired for a sleeker, more minimalist look, which can be appealing in certain contexts.
Removing dirt bike graphics can breathe new life into a motorcycle. For those looking to explore graphics options after removal, check out our selection of dirt bike graphics to find something that fits your style!
Methods for Softening Adhesive Residue after Removing Dirt Bike Graphics
Removing old graphics from a dirt bike often leaves behind stubborn adhesive residue that can be a hassle to clean. Here, we explore various methods and products that can help soften and remove this residue effectively. These solutions cater to both DIY enthusiasts and professional recommendations.
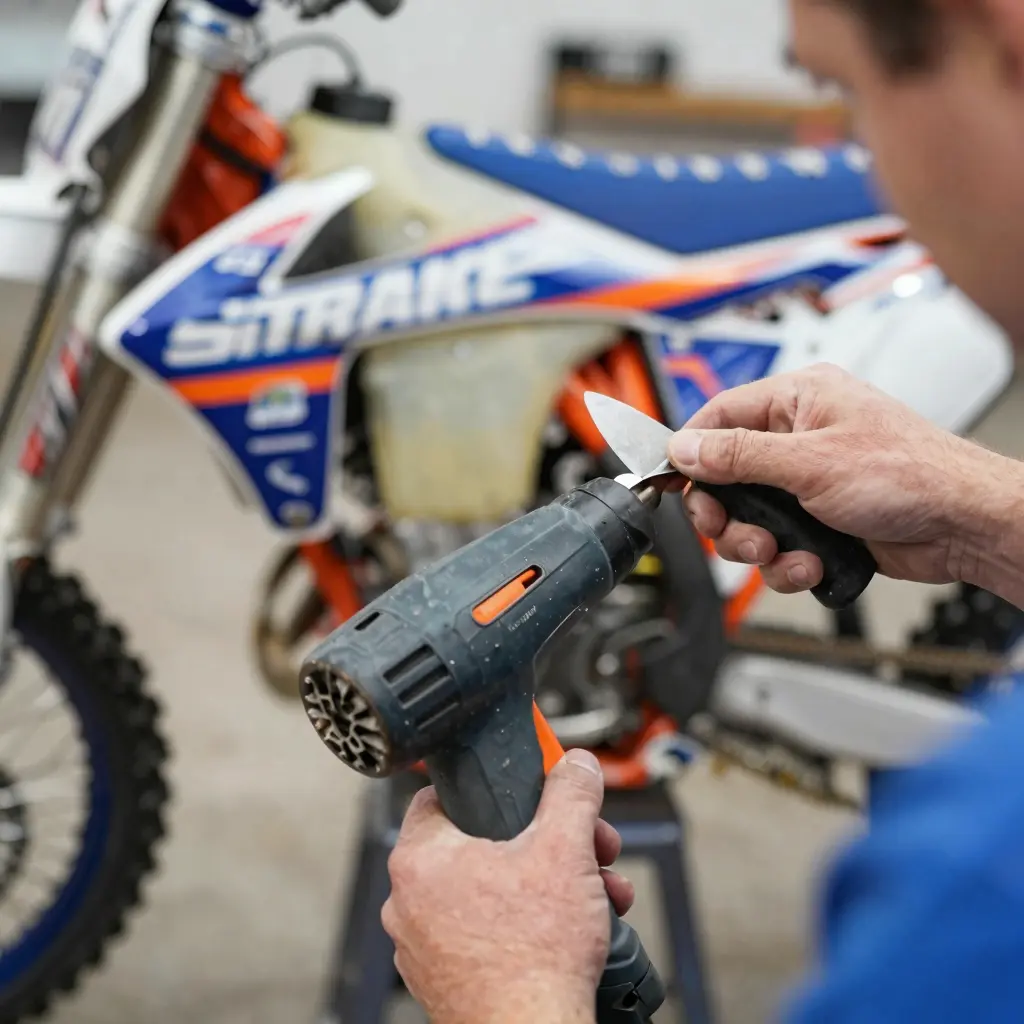
1. Heat Application
Using heat is one of the most effective ways to soften adhesive residue. A heat gun or an industrial-grade hair dryer can be employed to gently warm the adhesive. By softening it with heat, you make it easier to peel off without leaving extensive residue behind. Here’s the recommended approach:
- Procedure: Slowly pass the heat source over the adhesive area, being careful not to damage the underlying surface.
- Note: This method should be conducted with caution, as overheating can warp or damage some materials. For detailed strategies on using heat for graphics removal, you can learn more here.
2. Using Commercial Adhesive Removers
Specialized adhesive removers are designed to break down sticky residues effectively. These products usually contain solvents that dissolve adhesives without harming the surface beneath. Here’s how to use them:
- Procedure: Apply the remover to a clean cloth and rub it gently against the residue until it begins to lift. Allow it to sit for a few minutes if the residue is particularly stubborn.
- Recommendation: Always test on a small, inconspicuous area first. You can apply methods from guides like this one on fleet graphics removal for effective results.
3. Soap and Warm Water
For a more DIY approach, warm soapy water can be a simple yet effective solution to soften adhesive residues. This method works best for less stubborn adhesives.
- Procedure: Mix warm water with dish soap, soak a cloth in it, and place it over the residue. The heat and moisture help to break down the adhesive over time.
- Outcome: This option is eco-friendly and minimizes the risk of damage to the bike’s surface.
4. Cooking Oils or Vegetable Oils
Interestingly, cooking oils can also be utilized to tackle adhesive residue. The oil penetrates the adhesive, making it easier to wipe away.
- Procedure: Apply a small amount of oil to a cloth or directly onto the residue and let it sit for a few minutes. Wipe off with a clean cloth afterward.
- Effectiveness: Oils are especially useful for less aggressive adhesives and are a safe alternative to chemical removers.Voila Stickers presents practical insights on using oil for residue removal.
Conclusion
Whether you choose a DIY method with warm soapy water or opt for commercial products and heat application, properly caring for the surface during adhesive removal is essential. Consider these various approaches to ensure a clean and smooth finish, ready for new graphics. This way, you can effectively maintain your dirt bike, ensuring it looks its best for every ride!
A Step-by-Step Guide on How to Remove Dirt Bike Graphics
Removing dirt bike graphics can be an essential task for motorcycle owners, technicians, and repair shops. Whether you’re upgrading to new graphics or simply tired of the old ones, this guide will explain how to effectively remove dirt bike graphics in a step-by-step manner.
Tools and Materials Needed
Before starting the process, it’s essential to gather all the necessary tools and materials:
- Heat Gun or Hair Dryer: Helps soften the adhesive.
- Plastic Scraper or Credit Card: Used for gently scraping the graphics off.
- Adhesive Remover: To clean up any sticky residue left behind (e.g., Goo Gone, WD-40).
- Microfiber Cloth: For cleaning surfaces post-removal.
- Isopropyl Alcohol: To wipe down the area after removing the graphics.
- Gloves: To protect your hands.
- Cutter Knife: This can be helpful in cut graphics if necessary.
Step 1: Prepare Your Workspace
Start by finding a clean, flat surface to work on. Make sure you have adequate lighting and that your dirt bike is turned off and stable. You may want to consider protecting any surrounding areas with a drop cloth to catch any residue or debris.
Step 2: Heat the Graphics
Using a heat gun or hair dryer, gently warm the graphics you want to remove. Keep the heat source about 6 inches away from the graphics and move it in a circular motion. Heating the graphics softens the adhesive and makes them easier to peel off.
Tip: Be cautious not to overheat, as this can damage the underlying plastics of your bike.
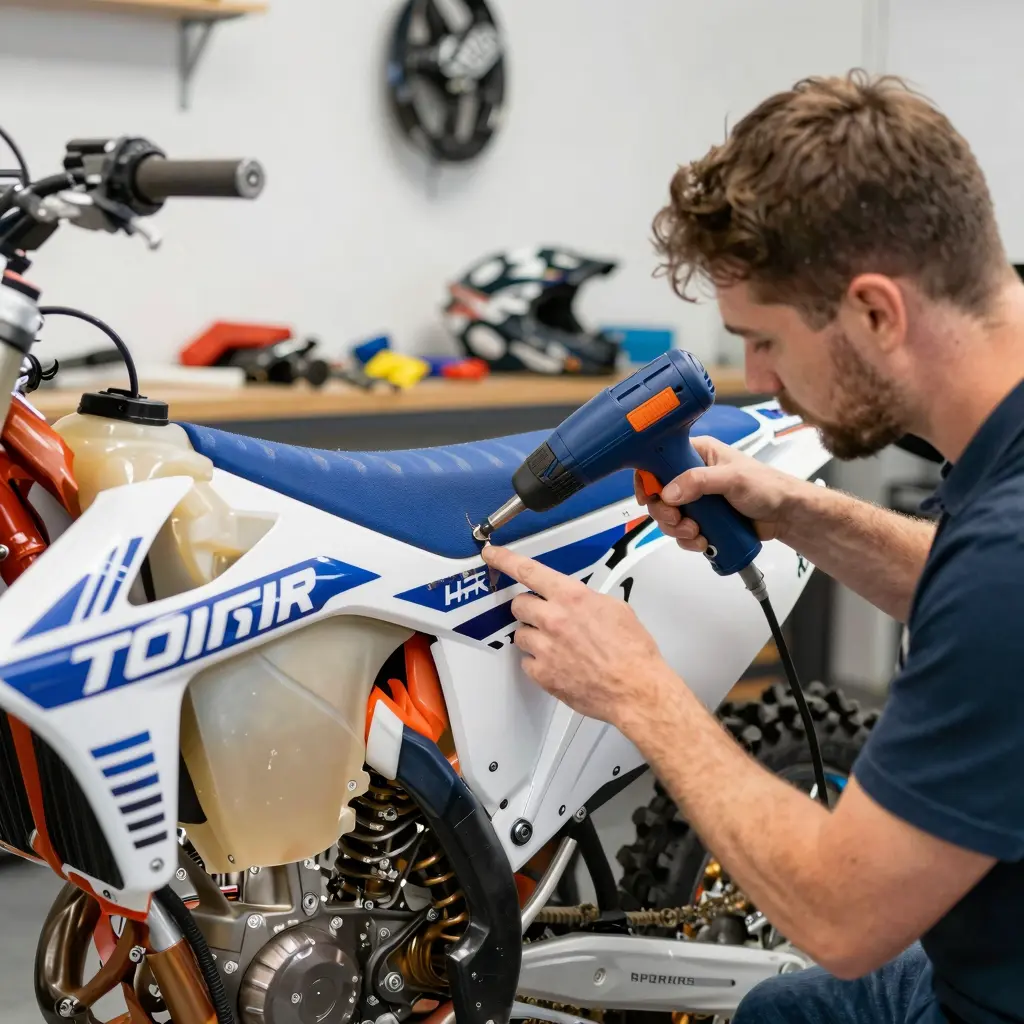
Step 3: Start Peeling
Once the graphics are heated, use your plastic scraper or a credit card to start lifting one corner of the graphic. Be gentle to avoid damaging the plastic beneath. If the graphic doesn’t come off easily, reapply heat to the area.
Step 4: Remove the Graphics
Continue peeling the graphics off slowly. Work from one corner to the other, keeping the heat applied as necessary. If you encounter resistance, stop and heat the area again before proceeding.
Step 5: Clean Up Residue
Once the graphics are completely removed, you’ll likely have some adhesive residue left on the bike. Apply adhesive remover to a microfiber cloth and gently wipe down the area to remove any sticky remnants. You might need to let it sit for a minute to be effective.
Step 6: Wash the Surface
After removing the adhesive, it’s a great idea to wash the area with soap and water or use isopropyl alcohol to ensure it’s clean. This step prepares the surface for new graphics if you’re planning to install them.
Step 7: Inspect the Surface
Inspect the area for any damage or scratches that may have occurred during the removal process. If the surface is smooth and clean, you’re ready to apply new graphics!
Additional Tips for Success
- Patience is Key: If you rush the process, you may end up damaging the plastic or the bike’s finish.
- Taking Breaks: If you’re having trouble, take a break and let the graphics cool down slightly before heating again.
- Personal Safety: Always wear gloves when using adhesive removers and ensure proper ventilation in your workspace.
Conclusion
Now that you know how to effectively remove dirt bike graphics, you can head over to MotoGraphics to find stylish new graphics for your bike. Remember to follow the steps carefully, and you’ll have a clean surface ready for your next design.
By following these steps, novice motorcycle owners will not only save money by doing it themselves but also gain valuable hands-on experience with their bikes. Enjoy customizing your dirt bike and ride with pride!
Comparative Table of Graphic Removal Tools for Motorcycles
When it comes to removing graphics from dirt bikes, various tools can be employed, each having its own advantages and disadvantages. Below is a comparative table of popular graphic removal tools:
| Tool | Pros | Cons |
|---|---|---|
| Heat Guns | – Effectively softens adhesive – Can be used on various surfaces – No chemicals required |
– Risk of damaging the surface if used improperly – Requires careful handling due to high temperatures |
| Scrapers | – Manual and straightforward to use – Affordable – No toxic fumes |
– Requires elbow grease – May scratch the surface if not used carefully |
| Chemical Removers | – Typically very effective on stubborn adhesives – Fast acting |
– Can be hazardous to work with – May harm the surface or paint – Requires ventilation and safety precautions |
This table provides a quick reference for motorcycle owners, repair shops, and technicians to choose the most suitable graphic removal tool for their needs.
For more tips on maintaining your bike graphics, you can learn more about dirt bike graphics or explore other options suitable for your motorcycle type.
Best Practices for Removing Dirt Bike Graphics
Removing graphics from your dirt bike can seem daunting, but with the right approach and tools, the process can be straightforward and effective. One seasoned motorcycle technician advises:
“Taking your time with graphics removal is essential. Use a heat source to soften the adhesive and avoid damaging the surface underneath. Patience is key-rushing can lead to scratches or a poor finish that requires extra work later on.”
Incorporating proper techniques not only protects your bike’s integrity but also prepares it well for fresh graphics. For high-quality graphics, check out the latest offerings on MotoGraphics.
Steps to Remove Graphics:
- Gather Necessary Tools: You will need a heat gun or hairdryer, plastic scraper, adhesive remover, and clean cloths.
- Soften the Graphic: Use the heat source to gently warm the graphic to loosen the adhesive.
- Scrape Carefully: Employ the plastic scraper to lift the edge of the graphic slowly, pulling it away without pulling too hard.
- Clean Residue: Apply adhesive remover to eliminate any leftover glue.
- Final Wipe Down: Clean the area thoroughly to prepare for new graphics or a fresh look.
By following these steps, you can ensure that the removal process is done correctly, maintaining the aesthetics of your bike. For more tips on dirt bike customization and repairs, visit MotoGraphics.
Tips for Avoiding Damage During Graphics Removal
Removing graphics from a dirt bike can be a delicate process, and if not done correctly, it can lead to damage to the bike’s surface, making it essential for motorcycle technicians and owners to adhere to best practices. Follow these tips to ensure a safe and effective graphics removal process:
1. Use Heat Carefully
Warming the graphics before peeling is one of the most effective methods for safe removal. A heat gun or hairdryer can be used to apply slight heat to the graphics, making them more pliable and easier to peel off. Be cautious not to overheat the area, as excessive heat can damage the underlying paint or plastic. Start at a low heat setting and gradually increase it as needed.
2. Utilize the Right Tools
Using the right tools can significantly reduce the risk of damage. Invest in plastic scrapers, which are less likely to scratch the bike’s surface compared to metal tools. A soft cloth can also help in lifting the graphics without causing any abrasions.
3. Avoid Harsh Chemicals
In cases where adhesive residue is left behind, avoid using harsh chemicals that can strip the paint or damage the finish. Opt for gentle adhesive removers or rubbing alcohol. Always test any product on a small, inconspicuous area first to ensure compatibility with the bike’s surface.
4. Take Your Time
Rushing the process can lead to mistakes and damage. Be patient and methodical in your approach, slowly peeling away the graphics and using heat as necessary. If the graphic isn’t coming off easily, stop and reapply heat instead of forcing it off.
5. Clean the Surface After Removal
Once the graphics and adhesive have been removed, clean the area thoroughly to prevent dirt accumulation and to inspect for any damage. A gentle wash with soapy water followed by a rinse and dry will help maintain the integrity of the bike’s surface.
By following these best practices, motorcycle technicians and owners can successfully remove graphics without compromising the quality of their bike’s appearance. For high-quality graphics that are easier to apply and remove, check out our collection of dirt bike graphics.
Removing graphics from your motorcycle can greatly improve its aesthetics, yet it leaves behind surfaces that require careful aftercare to maintain their shine and integrity. Here’s a comprehensive guide on how to care for your motorcycle surfaces after graphic removal, including cleaning and protection tips.
1. Cleaning the Surface
Once you’ve removed the graphics, the first step is to clean the motorcycle surfaces thoroughly. Residual adhesive from the graphics can attract dirt and grime, which could tarnish the paintwork. It’s essential to follow these steps:
- Use Appropriate Cleaners: Opt for a mild car wash soap mixed with warm water to wash the removed areas. Avoid harsh chemicals that may harm the paint finish.
- Soft Microfiber Cloths: Utilize a clean microfiber cloth to prevent scratching. Gently wipe down the areas where the graphics were applied.
- Adhesive Remover: In cases where adhesive residues remain, apply an automotive adhesive remover specifically formulated for painted surfaces (like the 3M Graphic Remover System). Follow the manufacturer’s instructions for safe and effective usage.
2. Protecting the Finish
After cleaning, protecting the motorcycle’s paint becomes crucial to maintaining its appearance:
- Wax or Sealant: Once the surface is clean and fully dry, reapply a good quality wax or paint sealant. This layer acts as a protective barrier against UV rays, dirt, and moisture, which can all contribute to fading and deterioration.
- Paint Protection Film: Consider applying a paint protection film, which can shield against scratches, road debris, and environmental damage. Options like InvisiGARD Paint Protection Kits are specifically designed for motorcycles, helping to preserve paint integrity post-graphics removal.
- Regular Maintenance: Make it a practice to regularly wash and wax your motorcycle, focusing on both protected and previously graphic-covered areas to prevent the buildup of harmful contaminants.
3. Maintaining Appearance
Maintaining the overall appearance of your motorcycle is an ongoing effort. Here are some additional tips:
- Avoid Abrasive Materials: While cleaning, refrain from using anything abrasive that may damage the paint. Stiff brushes or rough cloths can cause scratching.
- Frequent Inspections: Regularly check for any signs of wear or damage, especially on the areas previously covered by graphics. Promptly addressing any issues can prevent larger problems later.
- Store Properly: When not in use, store your motorcycle in a clean, dry place, preferably under a cover that won’t scratch the paint.
By following these aftercare strategies, motorcycle owners can ensure that their bikes continue to look their best long after the removal of graphics. To get great products for your graphic application needs, check out MOTOGRAPICS’ motorcycle graphics collection.
Maintaining a motorcycle’s appearance post-graphic removal requires diligent cleaning and protecting strategies. Use the tips provided to keep your bike looking sharp and prolong its life.
When it comes to removing dirt bike graphics, the decision to seek professional help can significantly impact your motorcycle’s aesthetics and lasting value. Professional graphic removal services not only ensure precision and care during the process but also protect the underlying paintwork from damage.
Advantages of Professional Removal
-
Expertise and Precision: Professionals come equipped with the experience and specialized tools required to remove graphics safely. For instance, heating elements help in loosening the adhesive, significantly reducing the risk of scratching or damaging the paint beneath. A poorly executed removal attempt can lead to costly repairs and dissatisfaction with the end result.
-
Time-Efficiency: Attempting to remove graphics on your own can lead to frustration and wasted time, especially if you encounter stubborn materials. Professionals guarantee a quicker turnaround, allowing you to enjoy your motorcycle without unnecessary delays.
-
Preservation of Value: Your motorcycle is not just a vehicle; it’s an investment. By ensuring a clean, damage-free removal of graphics, professional services protect its resale value. This becomes particularly important if you plan to sell or trade in your bike in the future. You could potentially increase your motorcycle’s marketability with a clean surface, devoid of leftover adhesives or scratches that might give a shabby impression.
-
Quality Finish: Hiring professionals means that you can expect a quality finish. Unlike DIY methods that may leave residue or damage, expert removal provides a clean and fresh surface for new graphics, enhancing the overall appeal of your bike. This approach works especially well when considering changing up your motorcycle’s aesthetic. Top-notch graphics can truly transform the look of your dirt bike while keeping it unique to your style.
Professional help in graphic removal is thus not merely an added expense but a worthwhile investment for motorcycle owners and technicians. The peace of mind that comes with knowing your bike is in skilled hands can save you from future complications while enhancing your riding experience. If you’re considering updating your dirt bike’s look, don’t hesitate to explore high-quality motorcycle graphics available at MotoGraphics and see how professionals can make the difference.
In conclusion, the benefits of utilizing a professional for graphic removal are numerous-ranging from preserving your motorcycle’s aesthetic elegance to safeguarding its intrinsic value for years to come. So, when it’s time for a change, rely on the experts to ensure that your dirt bike shines with the freshness it deserves.